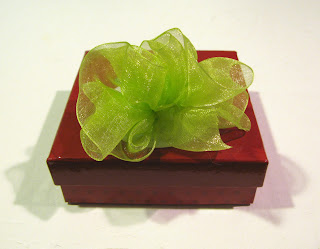
Organdy Gift Bow and Organdy Ribbon Scarf
Materials
Yarn: 1 ½” x 5 yds organdy ribbon (100% nylon, from Joann’s) 1 roll for bow project, 5 rolls for scarf (1 roll makes about 10”)
Needles: US 6 dpns for bow, US 7 straight needles for scarf
Notions: tapestry (yarn) needle, xacto knife, scissors
Gauge: does not matter
Size: Makes 3” bow or about 48” scarf
Stitch Glossary
BO – Bind Off
K –Knit
Rpt – Repeat
RS – Right Side
St(s) – stitch(es)
yo – yarn over
WS – Wrong side
How to Prepare Organdy Ribbon
Although you can skip this part and puncture the ribbon with your knitting needle, it’s an easier knit when it’s pre-punched like yarn store ribbon. Put in a brand new blade in your Xacto knife. (A sharp tip is important.) On a work surface (not your lap) use your non-dominant hand to hold and provide tension on the ribbon a safe distance from the blade action. With your dominant hand, rest your hand on the work surface to hold the ribbon taut and using the blade upside down, push the blade about ¼” down from the ribbon edge. See pictures. Push blade about halfway into ribbon. Your slit will be near the edge. I spaced mine about 1” apart but that’s up to you. Being consistent is important because the cuts self-heal and it will help when you are locating the holes while knitting. (I tried cutting holes through multilple layers to speed up the process but the ribbon slides, so one at a time is the way to go.)
 ATTENTION / CAUTION: To be clear, this part is not for children. As for adults, always check what is behind the blade before cutting. Keep all fingers a respectable distance and if you are having one of those days where nothing is going right, skip this part.
 If you cut through the edge of the ribbon, move over a ¼” and cut a new hole. The error won’t show and doesn’t matter. Just use less pressure. I found that you get into a rhythm that keeps your fingers out of the way, the cuts consistent and it doesn’t take as long as you thought.
Gift Bow Pattern
This is knit in i-cord fashion, but oddly, the WS is flat.
CO 3 sts on dpns.
K3, do not turn. Slide sts to other end of needle.
At the beginning of every row, skip the 1st hole in the ribbon and K 3.
Rpt this process until desired size. (I knit 5 rows for bows shown.) BO.
Note: Bind off is hard. It’s not you, it’s the ribbon because it has no give. I cut the ribbon “tail” at a 45 degree angle and thread through a yarn needle and run it through the final bind off st. I re-cut it to remove frayed edge.
I hot glue the bow to the wrapping paper.
Alternative Idea
Hair Barrette: Because the bow has a flat WS, it hot glues well to a hair barrette.
Organdy Ribbon Scarf Pattern
This project is flat knit. Ironically, this is round in shape.
CO 3 sts. Using US 7 straight needles.
K3 every row, skipping the first hole in the ribbon at the beginning of the row.
When adding a new spool, knit through both the last hole in the current ribbon and the 1st hole in the new ribbon roll and bring both through to make the st.(This can be anywhere in the row.) Next row, knit as one st.
When desired length, BO.
Note: Bind off is hard. It’s not you, it’s the ribbon because it has no give. I cut the ribbon “tail” at a 45 degree angle and thread through a yarn needle and run it through the final bind off st. I re-cut it to remove frayed edge.
© 2012 Scarlett “Kiki” Geiger ● yok2tog..blogspot..com
TheBrownDog..etsy..com
ssgeiger@cox.net
September 2012


